Friday, November 28, 2014

Chocolate Truffles

This is the one that started it all . . .I don't know where it originated, but I have been using this basic recipe for almost 20 years.  Wow.  

This recipe produces a very rich, decadent, velvet-like truffle center.  You will be sure to enjoy!


Chocolate Truffles
Yield:  approx. 30 (1-inch) truffles

Ingredients:
3/4 Cup Butter
1 Tablespoon Vanilla
3/4 Cup Cocoa 
1 (14oz) Can of Sweetened Condensed Milk
1 LB Vanilla Candy Coating 
Sprinkles or Colored Candy Coating (optional)

Part 1:  In a heavy saucepan over low heat, melt the butter.  Add the cocoa and stir until smooth.  Add the sweetened condensed milk and vanilla.  Stir until thick and glossy.  This usually takes about 5 minutes for me.  Remove from the heat and pour into a bowl.  Cover and let chill in the fridge for a 3-4 hours so that it can set-up.  I often leave this overnight.

Part 2:  Prepare a cookie tray by lining it with wax paper.  Once thoroughly chilled, form the dough into balls.  You can do this by using a very small cookie scoop (which is what I use) or you can just spoon a portion out and roll in your hands.  Be sure to work swiftly and quickly so that you do not let your body heat from your hands melt the dough.  Once shaped, place on the tray.  Repeat until all dough is formed.  Place tray in the fridge until ready to dip or coat.

Part 3:  To coat or dip, in a double boiler, melt 1 pound of vanilla candy coating.  Let cool slightly.  You want it to be fluid, but not too hot to the touch.  To dip, remove the dough balls from the fridge and one by one, using a fork, dip a ball into the vanilla candy coating, remove with a fork, shake the excess off and then place on a wax paper lined tray to let dry/harden.  To decorate, top with sprinkles or a zig-zag of a contrasting color in vanilla candy coating.  Repeat the dipping process until all truffles are coated.  Place in fridge to harden.  

To store, place in an airtight container and keep in the fridge.  They will last up to 8 weeks.

Tip:  You can flavor these easily by omitting the vanilla extract and adding your favorite flavor.  


Friday, November 21, 2014

Polynesian Party Wings

These are so dang good . . .I had forgotten about how delicious they taste.  When chicken wings were on sale last week at the grocery store, M & I thought to ourselves . . .yeah, we could totally go for some wings.  But we had just had spicy buffalo chicken not too long ago.  So then what?  Aha . . . . sticky wings!!  These are a potluck favorite and are always gone instantly.  Beware – although this recipe makes 3 lbs of wings, you soon learn that 3 lbs really isn’t that much!  You can easily serve these as a main dish with some rice on the side.   They also make a great finger food/appetizer (hint hint . . .holiday or Superbowl time).   The best way I can describe them is a blend between an Asian flavor and a Polynesian flavor.  They are not spicy at all – however, some red pepper flakes would add a new dimension for those who like it hot (experiment at own will)!  As well, I highly recommend lining the cookie sheet/baking pan with tinfoil OR just use a cheap tinfoil pan.  The sauce gets real sticky when you bake the wings – and the pan is not fun to clean!  Unless, of course, you are not the one doing the dishes – then who cares!  I also need to put a plug in about soy sauce in general.  Although this recipe calls for regular Soy Sauce, our family has discovered that we actually prefer Low-Sodium Soy Sauce by Kikoman.  It actually has flavor, other than salty.  If you haven’t tried it – I recommend it.


 Polynesian Party Wings

3lbs Chicken Wings, thawed or fresh
1 Cup Soy Sauce
1 Cup Sugar
1 Cup Water
½ Cup Pineapple Juice
1 tsp Ground Ginger
1 tsp Garlic Powder

 In a large bowl, mix together all ingredients excluding the meat.  Mix well.  Add the wings and stir to coat the meat.  Cover and let marinade for at least 4 hours or up to 24 hours in the fridge.  I like to mix this up at night and let them marinade overnight.  

Prepare baking sheet:  line sheet with tinfoil and spray with nonstick cooking spray.  Or, prep tinfoil pan with nonstick cooking spray.  Preheat oven to 350 degrees F.  Bake wings for 1 – 1.5 hours, until tender and fall off the bone.  Yummmmmmmmmmmmmm.

Friday, November 14, 2014

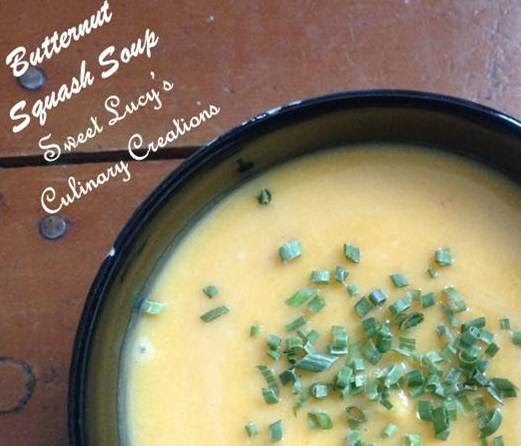
Butternut Squash Soup

Is there any soup more wonderful than butternut squash soup?  Mmmmmm . . .the natural sweetness of the squash kissed with a hint of earthy-ness, creamy and with a hint of cinnamon.  Comfort food at it's finest served on a cold fall day.


Butternut Squash Soup
Serves 4

Ingredients:
4 Tablespoon Butter (unsalted)
2.5 Pounds of Butternut Squash - this is the weight before peeling it.
1 Cup Water
1 Cup Milk
1 Teaspoon Brown Sugar
1/4 Teaspoon Cinnamon
Pinch of Nutmeg
Chives (for garnish)
Salt and Pepper 

Step 1:  Prepare the squash by cutting of the ends, removing the seeds and then peeling it.  Once peeled and gutted, cut into small chunks/squares and place in a microwavable bowl.  Add the water to the bowl, cover it with plastic wrap and cook on high for 10-13 minutes.  When it is done, it will be soft and you should be able to take a chunk out and squish it with a fork very easily.

Step 2:  In a blender, puree the squash.  To do so, add about 1/2 to the pitcher of the blender and puree.  If it is too thick, add 1/4 cup of water at a time until you can puree it to a smooth consistency.  Repeat this process with the remaining sauce. I ended up using roughly 1 cup of water to help puree it all.

Step 3:  In a large pot, melt the butter.  Once melted, add the squash and remaining ingredients.  Heat on low, stirring, until heated through.  Too thick?  Add in a little more milk.  Season to taste with salt and pepper and garnish.  Serve warm.


Friday, November 7, 2014

Pumpkin Delight Dessert

Pumpkin .. .the signature flavor of the fall season.  Sometimes I get little bored with pumpkin bread, pumpkin muffins, pumpkin bars etc.  I wanted to come up with something not-baked/not-cakey.  And I still wanted cream cheese too.  This creamy and dreamy dessert was exactly what I wanted.  I hope you enjoy!


Pumpkin Delight Dessert
Serves 9

Crust Layer Ingredients:
1/2 Cup Flour
1 Tsp Brown Sugar
4 Tablespoon Butter, room temperature
1/3 Cup Chopped Hazelnuts (or other nut of choice)

Pumpkin Layer Ingredients:
1 (8-oz) Package Cream Cheese
1 Cup Pumpkin Puree
1 Cup Powdered Sugar
1 Teaspoon Cinnamon
1/4 Teaspoon Ground Cloves
1/4 Teaspoon Nutmeg
1/2 the Cool Whip Tub (see below)

Top Layer:
1/2 of a (8-oz) Tub Cool Whip

Crust Layer Instructions:
In bowl, mix together all ingredients until well blended. Press into an 8x8 or 9x9 baking dish.  Bake in a preheated 350 degree oven for 10-12 minutes, until just beginning to brown.  Remove from oven and let cool completely.

Pumpkin Layer Ingredients:
Combine all ingredients into a bowl and beat with an electric mixer until well blended.  Fold in the Cool Whip.  Spread evenly over the cooled crust.

Top Layer:
Spread the remaining Cool Whip over the top of pumpkin layer.  Garnish with additional hazelnuts and cinnamon if desired.

Cover and chill for 4 - 6 hours before serving.