Friday, August 30, 2013

Brownie "Dump" Bars

There are a few recipes that always seemed to be repeated every few weeks at my Mom's house when I was kid.  Scotcharoo's (sans the frosting), White Cake w/ Almond Frosting, and Brownie "Dump" Bars.  And it's the Brownies that keep reappearing at my own household.

Please Note:  this picture was taken late at night . .. and it seems that the brownies tend to disappear in the blink of an eye.  I'm lucky I was able to capture a photo before they were all gone!


The recipe comes from a community cookbook called "Recipes in Rhythm" - it was a cookbook published for a marching band fundraiser.   And when you open the book, it falls right to the page with this recipe on it.  How convenient for me :) It's a basic, reliable and no-frills brownie - made in one bowl. Everyone needs a recipe like this in their arsenal for when your craving something simple and sweet.  Or to feed all the neighborhood kids because your house is party-central.

Brownie "Dump" Bars
Ingredients:

2 Cups Sugar
1 Teaspoon Salt
1 and 3/4 Cup Flour
1 and 1/4 Cup Vegetable Oil
5 Eggs
1 Teaspoon Vanilla
3/4 Cup Cocoa Powder
1 Cup Chocolate Chips (optional)

Preheat the oven to 350 degrees Fahrenheit and grease a 9x13 pan.  "Dump" all ingredients (except chocolate chips) into a large bowl.  Mix with spoon until all ingredients are moistened and combined.  Spread into greased pan.  If using, sprinkle with chocolate chips on top.  Bake for 30 minutes or until toothpick inserted comes out clean.  

Please note, I did not use chocolate chips this time.  I was fresh out (as in I-ate-them-last-night).


Friday, August 23, 2013

Blue Cheese-and-Pecan-Stuffed Celery


Have you ever tasted something and then you were instantly addicted?  I save that statement for a few things in life  . . .and this recipe is one of them.  I originally tasted these little devils while at a good friends party.  Blue Cheese, Dried Cranberries, Cream Cheese, Pecans . . .SWOOOOOOOON!  I ate one and became embarrassingly addicted.  I suddenly didn't care about anything else at the bbq . .. just these celery sticks.  I couldn't stop eating them.  I didn't ask for the recipe because I knew I would be in big time trouble.  

Fast forward two years:  said friends are having party again.  I I-N-S-I-S-T on them serving these "fancy ants on a log" or I refuse to attend.  They complied and I camped out next to these fancy-ants-on-a-log and then tried to convince no one else to eat them.  

And then my friend Teri pinned the recipe on Pinterest for me so I had no option other than to repin it and save it.  Turns out it is originally a Rachel Ray recipe.  I very slightly modified it by increasing the dried cranberries and stirring in the black pepper.  I just went with what worked for me.  I'm convinced that the celery is only there to make yourself feel better about eating this evilly delicious concoction.  I could totally forgo the celery and just eat a bowlful with a spoon.  It's that good.  

Blue Cheese and Pecan Stuffed Celery
aka:  Fancy Ants on a Log

Ingredients:

1/2 Cup Blue Cheese
4 oz Cream Cheese, softened
1/2 Cup Chopped Pecans, toasted
1/2 Cup Dried Cranberries
Black Pepper
Celery

In a bowl, combine the cream cheese and blue cheese.  Mix together until well blended.  Add the pecans and cranberries and stir until combined.  Add black pepper to taste.  Spread on Celery.


Friday, August 16, 2013

Turkey Cous Cous Skillet

Have you ever tried couscous?  If you haven't - you are missing out.  It's a tiny pasta and is delicious.  You can learn about it here.  My family loves it. 

The other night we grilled up some turkey burgers but did not eat all of them.  So, I decided to chop up the leftover burgers along with some veggies and toss them with some couscous.  Easy and delish!


Turkey CousCous Skillet
Ingredients:
1 Cup CousCous
1 and 1/2 Cups Water
1/2 Cube Chicken & Tomato Bouillon Cube (Knorr) OR Chicken Bouillon (enough bouillon to flavor the water)
1 Pound Ground Turkey
6 Green Onions or Scallions
1 (large) Tomato
4 oz Feta Cheese
1 Teaspoon Oregano
1 Teaspoon Lemon Pepper
Salt & Pepper
Tzatziki Sauce (optional)

Step 1:  Prepare the couscous.  In a pot, add the water and the bouillon.  Bring to a boil.  Once boiling, add the couscous.  Cover and remove from heat, set aside and let stand for 10 minutes.

Step 2:  Spray a large skillet with non-stick cooking spray.  Add the ground turkey (season with the salt and pepper) and the cook over med-high heat until browned, crumbled and cooked through. 

Step 3:  While the meat is cooking, prepare your vegetables.  Clean and dice the tomato.  Clean and slice the green onion.  Add to the meat during the last few minutes of cooking along with the oregano and lemon pepper.  You just want to heat up the tomatoes and onions, not really cook them.

Step 4:  Once the meat is cooked and the veggies are combined with it, stir in the cooked couscous and the feta cheese.

For additional flavor, serve with a dollop of Tzatsiki sauce.  Viola!  Easy and delicious :)  Serves 4-6 people.

Friday, August 9, 2013

Fruit Crisp

It seems that I have an excess amount of fruit around the house this week.  Totally my fault.  I bought too much. Oh, what a bummer (sarcasm).  And by too much . .. I really mean that I bought more than what my toddler and I can eat.  It makes me really note that it's the teenager who eats most of the fruit around the house.  And she's not here this week.  So, I've opted to make a crisp or crumble out of my surplus of fruit.  


Fruit Crisp
Ingredients:

For the Fruity Part:
6 Cups Fruit (cut into small, bite size pieces) - I used cherries, blueberries, rhubarb and apples
1 Tablespoon Corn Starch
1 Tablespoon Flour
1 Tablespoon Red Wine 
1/2 Teaspoon Cinnamon
1/8 Teaspoon Salt

For the Crisp (Topping) Part:
3/4 Cup Oatmeal
3/4 Cup Cups Flour
3/4 Cup Cups Brown Sugar
1/3 Cup Butter, chilled
1/4 Teaspoon Cinnamon


Step 1:  Preheat the oven to 350 degrees Fahrenheit.  You will also need a 8x8 pan with tall sides OR an extra-deep (deep) dish pie pan.

Step 2:  Combine the fruit, flour, corn starch, red wine, salt and cinnamon together in a bowl.  Toss together until all fruit is coated.  Set aside.

Isn't all this fruit gorgeous?  This photo was taken before mixing the dry ingredients with it.


Step 3:  Cut the butter into small pieces.  I usually cut it into tablespoon pats, and then quarter each square.

Step 4:  In a bowl, combine the small butter pieces, oatmeal, flour, brown sugar and cinnamon.

Step 5:  Stir the fruit again and then pour into the baking dish and level it out.  Then pour on the "topping".  Be sure to spread out the topping all the way to the edges.  Yuuuuuuuum!

Step 6:  Bake in oven for 45-50 minutes, or until fruit is soft and top is lightly browned.  Let cool for at least 15 minutes before serving.


Friday, August 2, 2013

Cherry Almond Pound Cake

So, my intent was to make a Cherry Rum Cake.  After all, it is cherry season.  And it's always rum season.  However, Ol' Mother Hubbard here got to my cupboard and I was out of rum . . . and rum extract.  Phooey.  And a trip to the store was not going to happen today, unlike this cake - which did happen today.  Without rum, I was left to my devices (the cherry-pitter) and (slightly against my will) I used almond extract instead of rum.  Not that it isn't delicious .. . .it's quite wonderful.  Give it a whirl.


Cherry Almond Pound Cake

Ingredients:
1/2 Cup Butter
1 and 1/2 Cups Cup Sugar
1 and 1/2 Cups Flour + 2 TB
3 Eggs, room temp.
1/2 Cup Sour Cream
1/8 Teaspoon Baking Soda
1/8 Teaspoon Salt
1/2 Teaspoon Vanilla
1/2 Teaspoon Almond Extract
1 and 1/2 Cups Cherries (washed, pitted and quartered)

Please Note:  This recipe makes 1 standard loaf of pound cake.

Step 1:  Preheat your oven to 325 degrees Fahrenheit.  Grease and flour 1 loaf pan.  Set aside.

Step 2:  You will want your butter slightly cold for this recipe - so take it out of the fridge and let sit for 30 minutes.  Meanwhile, wash, pit and quarter the cherries.  Place them into a bowl along with the 2 Tablespoons of flour.  Gently mix with a spoon until all the cherries are coated.  This will prevent your cherries from sinking to the bottom of the cake while baking.  Set aside.

Step 3:  Grease and flour your favorite loaf pan.  As well, preheat the oven to 325 degrees Fahrenheit.

Step 4:  In the bowl of  a mixer, add the butter and sugar and beat until well creamed.  Add the eggs, one at a time and mix until well blended.

Step 5:  Measure out the flour, soda and salt.  Stir to combine.  Add to the butter/egg/sugar mixture and stir until just blended.  

Step 6:  Add the fresh cherries, the Vanilla and the Almond extract to the batter and fold until barely combined.

Step 7:  Bake at 325 degrees Fahrenheit for 90 minutes.  Let fully cool before removing from pan.

Serving Suggestions:  Serve slices of pound cake with any of the following:
- cherry sauce
- whipped cream
- sprinkling of powdered sugar
- spread a slice with butter
- vanilla glaze

Friday, July 19, 2013

Chocolate & Salted Caramel Cake

So, last week was my birthday.  And you know what that means:  

B I R T H D A Y   C A K E ! ! ! 


I did my research and decided on this sweet and salty number.  It was pretty amazing.   And very rich.  I suggest either a strong cup of coffee to enjoy with it or a glass of milk.  The cake is very moist, rich, dark and chocolaty.  And then you spread caramel on top of each layer.  And then slather salted caramel chocolate frosting on top of each layer as well as frost the cake altogether.  Definitely make it a day ahead of time and keep refrigerated.  You will not be disappointed.

Chocolate & Salted Caramel Cake

 Cake Ingredients:
3/4 Cup Cocoa Powder
1 and 1/4 Cup Hot Water
2/3 Cup Sour Cream
2 and 2/3 Cup All-Purpose Flour
2 Teaspoons Baking Soda
1 Teaspoon Salt
3/4 Cup Butter (unsalted), softened
1/2 Cup Shortening
1 and 1/2 Cup White Sugar
1 Cup Brown Sugar
2 Large Eggs, room temp
1 Teaspoon Vanilla

Step 1:  Preheat the oven to 350 degrees Fahrenheit.  Prepare two 9-inch round cake pans.  I use silpats in the bottom of mine - but you can grease and flour the pans instead.

Step 2:  In a bowl, combine the sour cream and cocoa powder.  Slowly stir in the hot water.  Stir together until well blended.  Set aside until needed later.

Step 3:  In large mixing bowl, add the butter and shortening - beat until smooth and well combined.  Then add the white sugar and brown sugar and beat again until smooth and fully incorporated.
Step 4:  In a seperate bowl, combine the flour, baking powder, baking soda and salt.

Step 5:  This is where you will combine the flour mixture and cocoa mixture with the creamed mixture.  To being, add 1/2 the flour and incorporate until well blended.  Add 1/2 the cocoa mixture and mix well.  Add remaining flour mixture and mix well.  Add remaining cocoa mixture and mix well.  Be sure to always scrape down the bowl between additions.

Step 6:  Divide the batter among the baking pans and bake for 25-35 minutes.  Ovens may vary, so be sure to test for doneness.  Once baked, remove from oven and cool completely.

Caramel Ingredients:

1 Can of Dulce de Leche (I buy mine at our local grocery store in the Hispanic section)
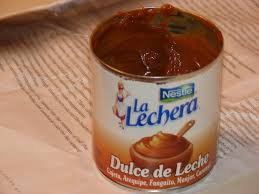


If you cannot find this product, you will want to use a very thick yet soft caramel.

Chocolate & Salted Caramel Ingredients:

1/2 Teaspoon Kosher Salt
1 LB Semi-Sweet Chocolate Chips
1 and 1/2 Cup Heavy Cream
2 Cups Butter (slightly softened, but yet cool and cut into tablespoon chunks)

Step 1:  Add the chocolate chips to a large mixing bowl as well as 1/2 the can of dulce de leche.

Step 2:  Heat the cream in a small saucepan until boiling.  Add the salt and stir to combine.

Step 3:  Carefully pour the cream over the chocolate chips and caramel.  Cover the bowl and let stand for 5 minutes.
Step 4:  Uncover the bowl and stir the mixture with a large spatula/rubber scraper.  Stir until combined, but don't fret about getting it fully incorporated.  Just stir it enough to get it mixed up - then beat it with the electric mixer until smooth.  Start on low and slowly increase the speed to medium and beat for roughly 5 minutes, until it is fully cohesive and incorporated.  Next, while the mixer is still on medium speed - add one tablespoon of butter and beat until well combined.  Continue to add the butter, 1 piece at a time and incorporated, until all the butter has been added.  Continue to beat for approximately 5 minutes until fluffy and smooth. Refrigerate until ready for cake assembly.

To Assemble the Cake:

Step 1:  Chill the cake layers for at least a few hours.  This will really help you with the assembly.

Step 2:  Carefully slice each layer in half to make 4 rounds.  I should have take pictures, but I didn't (bad blogger!).  To do so, take a ruler and mark 1/2 up the side of the cake and insert a toothpick.  Do this four times around the cake (spaced as if there were a north, south, east and west).  Carefully, with a sharp serrated knife, score the cake by "connecting the toothpicks" with the knife. Once you've made that score, carefully slice through the cake.  You will know have two pieces.  Repeat this process with the other cake.

Step 3:  Place one cake on a large plate or cardboard round.  Carefully spread 1/3 of the caramel (dulce de leche) across the top of the cake.  To make it easy spread, you can heat it up a little bit in the microwave or a saucepan.  Next, spread about 1 cup of the frosting on top of the caramel.  Do not spread to the edges - only go about 1/2 from the edge.  The frost will disperse itself when you add the next layer of cake.

Step 4: Place the next cake round on top of the first frosted round.  Repeat the above steps by spreading on the caramel and then the cake.  You will do this again with the next layer.  Once you have three layers of cake topped with the caramel and frosting, add the last cake layer.

Step 5:  Frost the sides of the cake sparingly (crumb coat).  I recommend using an offset spatula if you have one.  Then, frost the top the cake sparingly.  Once it looks smooth, frost the cake again with the remaining frosting - starting with the sides and finishing with the top of the cake.

Step 6:  Decorate the cake at one's own will. It would be beautiful with some chocolate shavings.  We decided to pipe out some words on it :)

Keep this cake in the fridge!  The frosting is very delicate.  Let it come to room temp to serve.  Enjoy.
And  .. . Happy Birthday to Me :)


Friday, July 12, 2013

Oatmeal Breakfast Bars


I have this love of oatmeal that is in-explainable.  I am at a loss of words for how I feel about it.  It makes me who I am today.  It completes me.  

Although, I must admit . . .I don't like prepared oatmeal aka a bowl of mush.  Yuck.  Can't stand it (it's a texture thing).   I do enjoy oatmeal in all other forms though:  granola, pancakes, cookies, breads, muffins, etc etc etc.  

And thus, I was searching for a new breakfast option.  The protein bars I so love are a little bit spendy.  So, I thought I would try to find something else to have for breakfast.  I'm not a health nut by any means.  But, I do love oatmeal and I like something sweet in the mornings.  As well, it must keep me full until lunch time.  These seem to fit the ticket for me.  I tweaked this recipe.  Next time, I may try to sub some applesauce in place of the oil.

Oatmeal Breakfast Bars

Ingredients:
4 Cups Oatmeal
1.5 Cups Flour
1 Cup Brown Sugar
1/2 Cup White Sugar
1 Teaspoon Cinnamon
1/2 Teaspoon Salt
4 Eggs
3/4 Cup Canola Oil
3/4 Cup Raisins
3/4 Cup Semi-Sweet Chocolate Chips
3/4 Cup Coconut Flakes (unsweetened)

Step 1:  Preheat oven to 350 degree Fahrenheit.  Measure out the dry ingredients into a large bowl (oatmeal, flour, both sugars, salt and cinnamon).  Stir together to combine.


Step 2:  Add the eggs and oil to the dry ingredients.  It may be a little tough to mix together using a spoon - I  ended up using my hands to mix it all together.


Step 3:  Add in the raisins, chocolate chips and coconut.  Mix well.  Holy Moly . .. does this look good already or what?!?!?!?!


Step 4:  Spray a 9x13 cake pan and press mixture into the pan.


Bake for 20-25 minutes - until it is slightly puffy and the edges are starting to turn golden.


I cut the pan into 24 bars.  1 bar = 240 calories, 2 grams fiber and 5 grams of protein.  And they are delicious!!!