Friday, March 29, 2013

Sweet and Spicy Pecans

I love these little devils.  They are out-of-this-world-good and are very addicting.  I warn you now.  And if you can stand to keep your mitt's off of them, they make a great little gift to give to your friends, coworkers, neighbors, etc. etc..


Sweet & Spicy Pecans

1 Pound Pecan Halves
1/2 Cup Brown Sugar, packed
1/4 Cup White Granulated Sugar
1 Tsp Salt
1 Tsp Cinnamon
1/4 Tsp Cayenne
1 TB Water
1 Egg White

Step 1:  Preheat oven to 250 degrees Fahrenheit. Meanwhile, in small bowl, combine the brown sugar, white sugar, salt, cinnamon and cayenne.  Blend well.
Step 2:  In a separate bowl, whisk the egg white and water until well combined and frothy.
Step 3:  Place pecans in a large bowl.  Add the egg white/water and coat the pecans.
Step 4:  Add the sugar/spice blend to the pecans.  Stir well to coat the nuts.
Step 5:  Grease a large cookie sheet and spread the pecans in an even layer.
Step 6:  Bake for 1 hour, stirring every 15 minutes.  Cool completely before serving.

Please note - if you would like a less-spicy nut, decrease the amount of cayenne.  Or, if you would like no-heat at all, omit the cayenne and you will have a just-as-delicious sweet, candied pecan.


Friday, March 22, 2013

Chocolate, Peanut Ice Cream Pie

So, last week was Pi Day (in case you missed it).  Pi Day = March 14th.  Get it?  Pi Day.  This will certainly identify who the math geeks are out in reader land.  Any who, I have a teenager who isn't so crazy about math.  However, she was very excited about Pi Day for whatever reason.  In fact, she was so excited about it - she was even in her math room at 3:14 pm on 3/14 (the date).  I felt it necessary to hop on that train and to celebrate this milestone by making a pie.

And if I said it once, I've said it a million times:  creativity is often spurred by empty cupboards and the lack of ambition to leave the house.

And for this treat - I had no fruit in the house. . . not even an apple.  Or whipped cream (who wants pudding pie with out whipped cream??).  And the hubby doesn't like meringue.  But, I did have an Oreo Pie Crust and vanilla ice cream.  Yes, yes . . .an ice cream pie it was!  

This isn't the best picture because I couldn't capture the differentiation of the layers very well.  But they are there:  Cookie Crust, Hot Fudge, Peanuts, Vanilla Ice Cream and more Peanuts.  This pie will live in infamy at our house.  The fudge layer was just soooooooooooo fudgy and evil.  Yes.  Evil.  And I cannot stop thinking about it.


Ingredients
1 Oreo Pie Crust
3 Cups Vanilla Ice Cream
1/2 Cup - 1 Cup of Peanuts (bonus if they are stolen from your hubby's lunch bucket, hehe!)
1/3 Cup + 1 TB Sugar
1/4 Cup Cocoa
1/4 Cup + 1 TB Half & Half 
3 TB Corn Syrup
3 TB Butter, sliced
1/2 Tsp Vanilla 
1 TB Instant Espresso Powder

Step 1:  Sprinkle the peanuts on the bottom of the pie crust.  Reserve some for decoration later.
Step 2:  Prepare the fudge sauce.  In a small saucepan, combine the sugar, espresso powder and cocoa.  Add in the Half and Half and corn syrup.  Heat on medium high and stir constantly.  Bring to a boil (keep stirring!) and boil for 1 minute.  Remove from the pan from the heat and add in the butter and vanilla.  Stir until the butter is melted and incorporated into the sauce.  Pour into the crust and then place the pie crust into the freezer until the fudge sauce firms up.
Step 3:  Once the fudge has firmed up, soften the ice cream and spread into the pie tin very gently.  
Step 4:  Garnish with remaining peanuts and return to freezer to firm up.  
Step 5:  Ingest, enjoy and live in that happy place induced by a sugar coma and dream about 3.14.

In this picture of a bite-sized morsel of pie you can see the layers much better!


Friday, March 15, 2013

Pacific Chops and Polynesian Rice


I have a confession.  Shh….. come closer.  Can you hear me whisper?  Are you sure?  Well, ahem, I have a bit of a confession . . . . I love cookbooks.  Not just any cookbook though:  I love old cookbooks.   I love the colors, the graphics, sometimes the foods/recipes . . .I find great pleasure in reading these old books.   And sometimes, I even make one of the recipes.  Like last night.   

I knew I wanted to make pork chops for dinner.  However, I wasn’t sure what I wanted to do with them.  It’s still winter-y here in MN and our outdoor grill is out of gas.  And I don’t have the patience for our little charcoal grill (don’t even ask).  So, what do?  I’ve got cabin fever, friends!  I didn’t want to bread and bake them.  I didn’t feel like just frying ‘em up any old way.  And then there it was – it was staring me down.  It was laying on the floor . . .likely a casualty of my toddler rummaging the book shelf and it was looking for a good time:  Patio Parties.  Published by Minnegasco circa 1959.


Hm.  Looks interesting enough with it’s bright neon green pages.  I wonder  . . .. 
Oh my.  This little gem “cookbook/pamphlet” has 7 dinner party ideas inside it.

1. Oriental Dinner &      2. Come For Brunch


3. Mid-West Wing Ding    &       4. Sportsman’s Luck


5. Children’s Frolic       6. Winter Cookout


7. Just for Fun


Each menu has 5 recipes in it . . .typically an appetizer, a salad, a protein, a side dish and a dessert.  Intriguing.  Each one has a “Set the Mood” area with table-scaping and decoration ideas.  

And what did I decide on?  Well, first things first – I’m not making a 5 dish meal tonight.  However, in the Oriental Dinner area – they had two recipes I was willing to try (and had ingredients on hand):  Pacific Lamb Chops and Polynesian Rice In Foil.   Granted, I did need to make a few adaptations to the recipes:  swapped out the lamb and used pork chops instead and I didn’t use a grill, I cooked them on the stovetop.  As well, for the rice dish – I didn’t make the individual serving packages and grill them.  Instead, I made it family style and placed it in a casserole dish and baked it.   That’s right baby – I  Minnesota-fied it!

Here are the recipes as they appear in the book.

Pacific Lamb Chops
¼ Cup Melted Margarine
½ Cup Soy Sauce
Pinch of Garlic Powder
6 Shoulder Lamb Chops, cut ¾ inch thick
Salt

Combine margarine, soy sauce and garlic powder.  Dip chops in mixture and place in shallow dish.  Pour remainder over the chops and marinate about an hour.  Remove chops from marinade and sprinkle lightly with salt.  Grill on preheated gas grill over medium to high flame for 8 to 10 minutes on each side.  (If drippings cause some flare-up, change position of chops on grill).  Serves 6.

Polynesian Rice in Foil
4 Cups Hot Cooked Rice
2 TB Butter or Margarine
1 Cup Think Strips of Green Pepper, about 1 inch long
1 Can (13-oz) Pineapple Chunks, drained
½ Cup Bottled Barbecue Sauce

Combine rice and butter;  toss lightly.  Add remaining ingredients.  Place individual servings (generous ¾ cup) of rice mixture on six 12x8inch pieces of aluminum foil.  Double fold seam on top and fold edges securely.  Place foil packages directly on preheated gas grill and heat over low to medium flame.  Turn once.  Allow 10 to 15 minutes per side.  Serves 6.

Okay . . . .  now here’s my version:

Pacific Lamb Pork Chops
¼ Cup Melted Margarine
½ Cup Lite Soy Sauce
Pinch ½ Teaspoon of Garlic Powder
6 Shoulder Lamb 4 Pork Chops, cut ¾ inch thick
Salt

Combine melted margarine, soy sauce and garlic powder.  Add to marinade-container with chops.   Dip chops in mixture and place in shallow dish.  Pour remainder over the chops and Marinate about an hour.  Remove chops from marinade and sprinkle lightly with salt.  Grill on preheated gas grill   and cook in frying pan over medium to high flame for 8 to 10 minutes on each side.  (If drippings cause some flare-up, change position of chops on grill).  Serves 6.

Gather up the ingredients and be sure to place a towel ontop of your stove because you don't want your viewers to see the nasty rings around the burners :)


Now, I have to say.  I love this marinade pan.  It's from Tupperware.  I feel like I've had it forever.  It's two pieces and is designed to have a tight seal and can be flipped upside down with ease.  Awesome.  No dripping, no spilt marinade.  For this recipe, place your oleo (margarine) in the top half of the marinade pan and microwave until melted.  Then add in the soy sauce (gawk at my pale and pasty hand) and a healthy amount of garlic powder.  Doesn't the swirl of the soy sauce look like some groovy art project?  And a word about soy sauce:  use lite or low-sodium soy sauce.  Once you try it, you will be addicted.  It is very flavorful and not salty!


Now that the marinade is ready, carefully pour it over your chops.  And if you have a handy-dandy pan like mine, seal the lid tight.  And if you don't, seal or cover whatever container you may be using.  And then for me and my container:  shake shake shake, shake shake shake.  


Let them sit for a while.  When ready to prepare, grill or pan fry them.  Don't they look delicious?  Aha.  And I'm glad you noticed:  there are only 3 of the 4 chops in the pan frying away.  That's because my pan was too small.


Polynesian Rice in Foil
4 Cups Hot Cooked Rice
2 TB Butter or Margarine
1 Cup Thin Strips of Green Pepper, about 1 inch long
1 Can (13-oz) Pineapple Chunks Tidbits, drained
½ Cup Bottled Barbecue Sauce

Combine rice and butter;  toss lightly.  Add remaining ingredients.  Place individual servings (generous ¾ cup) of rice mixture on six 12x8inch pieces of aluminum foil.  Double fold seam on top and fold edges securely.  Place foil packages directly on preheated gas grill and heat over low to medium flame.  Turn once.  Allow 10 to 15 minutes per side.  Place into buttered casserole dish (covered) and bake at 350 degrees Fahrenheit for 20-30 minutes or until heated through.  Serves 6.

Gather up those ingredients!  Do you have a rice cooker?  I absolutely love mine!  Go ahead and prepare your rice however you usually do it.  While it's cooking, prep the green pepper.


According to the recipe, you need to cut thin 1-inch strips of green pepper.  I'm such a rule follower.  Or am I?  haha.


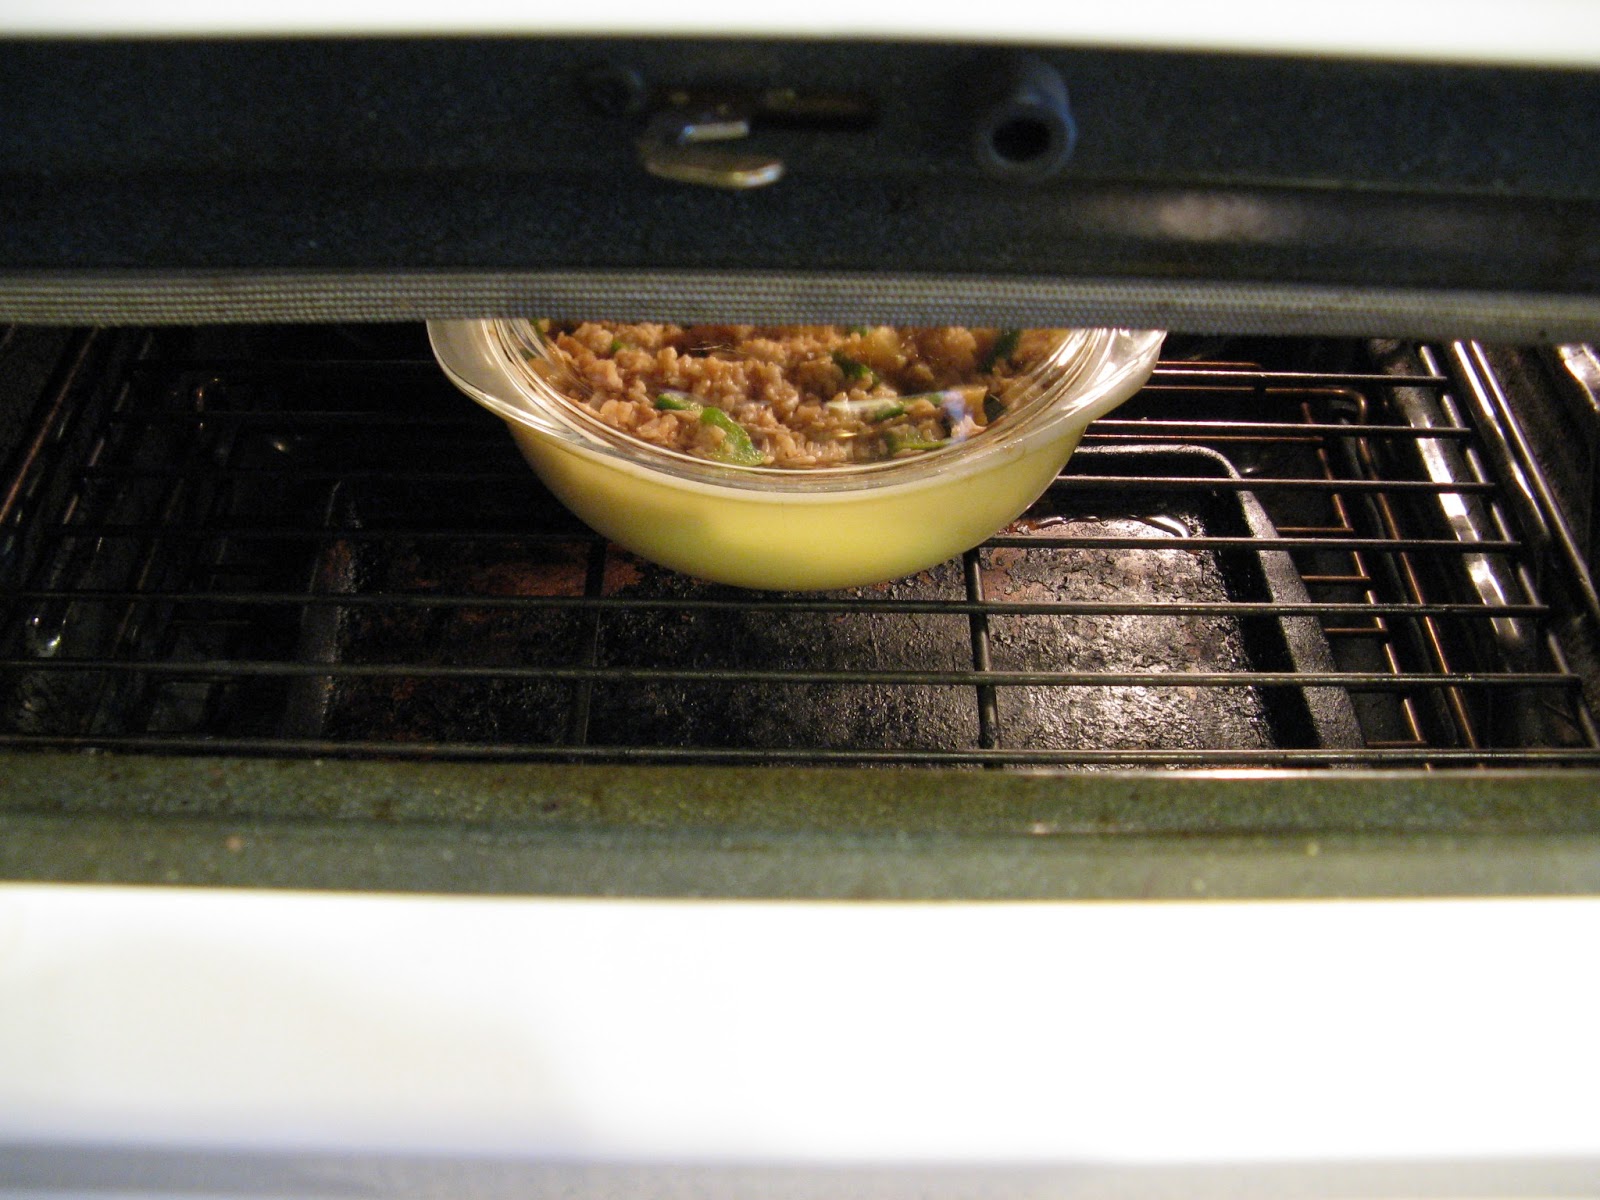
And because I Minnesota-fied the recipe, I buttered a casserole dish and then placed my rice and remaining ingredients into it.  I love this casserole dish.  It was my granny's.  Rest in Peace Granny!  And rest assured Granny, I use this dish with lots of love :)  I miss my Granny.  She was freakin' awesome.


And stir it up to get all good and combined.  Most people will likely use a spoon or a rubber scraper.  Me?  I opt for gloved hands.  I'm just groovy like that.


And into the oven you tasty casserole you!  I'll see you in about a 1/2 hour after your all nice and warm and hopefully delicious. 


And voila!  A Polynesian delight circa 1959.  A big thanks to Minnegasco :)  And by the way.  It was delicious.  My hubby added a little wasabi to his chop, but other than that - the family voted to eat it again!


Friday, March 8, 2013

Tequilaberry Salad


And so you ask, "what the heck is a tequilaberry?" Well, Tequilaberry was a local restaurant here in the Twin Cities in the Anoka area. They closed a while back, but at one time were very highly popular. This was the house salad there. It's super yummy and feeds a crowd - great for holidays or potlucks because it really does feed a crowd.  Try it. You'll like it. It's delicious.

Tequilaberry Salad

For the Salad:
1 Head Lettuce, torn into bit sized pieces
1 Head Cauliflower, chopped into bit sized pieces
1 Cup Bacon Bits (or more if you really like bacon)
1 Cup Parmesan Cheese

For the Dressing:
1 and 1/2 Cups Mayonnaise
1/3 Cup Sugar
1/4 Cup Milk

Place all salad ingredients in a large bowl. In a separate  not quite as large, bowl - mix the dressing ingredients until smooth. Pour over salad and toss the salad. Serve immediately.

If you plan to bring this to a potluck, here are a few tips:

- After making the dressing, store it in a separate container from the salad.  When ready to serve, just shake it up a bit before dressing the salad.
- Make sure that both the bowl and salad dressing container have tight fitting lids for travel purposes.
- Always tear your lettuce - never use a knife!  When using a knife, it bruises the lettuce and causes it to brown.  Tearing it does not have that effect.
- The salad and the dressing can be prepared up to 1 day in advance.  Just make sure to store them separately and only combine to serve.

Friday, March 1, 2013

Country Fried Steak


Need I say more?  Well, okay, maybe I do.  YUM.  Best meal we've had all week. The crust was flaky and crispy, the inside cooked perfectly.  I actually had to snap this photo before all the food was consumed (good golly, the gravy was already gone)!  It was soooooooooo good . .. that everyone was a member of the clean plate club last night.  And, everyone had second helpings too. 

Country Fried Steak
1 - 1.5 lbs Beef Cube Steaks - (cut into individual serving sizes if not already done so when purchased)
2 Cups Flour
2 Tsp Baking Powder
1 Tsp Baking Soda
1 Tsp Pepper
3/4 Tsp Salt
1.5 Tsp Garlic Powder
1.5 Cups Buttermilk
1 Egg, beaten
1 TB Tabasco (or other hot sauce of your choice)

Vegetable Oil for Frying

To get the party started, you'll need two shallow pans (pie tins work great).  Place the flour in one of the pans.  In the remaining bowl, add your egg and buttermilk.  Stir to combine.  Then add the baking powder, soda, pepper, salt, and garlic powder.  Stir to combine.  Lastly, add in the Tabasco and stir to combine.  Oh, yummy - it adds a little something that I just can't put my finger on.  It's not spicy at all, but definitely provides flavor.

These delicious steaks are going to be fried in oil.  So, grab your favorite large, heavy duty skillet and enough vegetable oil to fill it half way.  Heat on medium-high until the oil reaches 350 degrees.

To prepare the steaks, it's a 3-step dip:  1.  take a steak and dip it into the flour and make sure it's well coated.  2.  Dip it into the wet ingredients.  3.  Dip that same steak back in the flour, making sure to cover it well with the flour.  Once fully coated, place into the hot oil.  Repeat this process for all pieces of steak.  

Fry for about 5-7 minutes, turning once so that each side of the steak becomes a yummy golden brown.  Drain on paper towels before serving.

Please note, this can also be made in a deep fat fryer. 

We served ours with side of gravy (not pictured), mixed veggies and mashed potatoes.  YUM.  And don't mind my Christmas plate.  I've been too lazy to pack away my Christmas dinnerware.  Don't judge!