Showing posts with label Meatless. Show all posts

Friday, March 16, 2018

Rockin' Black Bean Soup

This recipe is adapted from the cookbook "The Cancer-Fighting Kitchen" Second Edition by Rebecca Katz with Mat Edelson.  I used a few shortcuts and omitted one ingredient from the original recipe (kombu . .not available in my local grocery store).  I've always enjoyed a good bowl of black bean soup - so I hope you enjoy this recipe as much as I have!


Rockin' Black Bean Soup
Serves 6

Ingredients:
1 15 oz Can of Black Beans (drained)
2 Tablespoons Extra Virgin Olive Oil
2 Cups Diced Yellow Onion
Sea Salt
1 Large Red Bell Pepper, Diced Fine
1 and 1/2 Teaspoons Chopped and Seeded Jalapenos
1 Tablespoon Garlic Minced
1 and 1/2 Teaspoons Dried Oregano
1/2 Teaspoon Ground Cumin
1/2 Teaspoon Ground Cinnamon
8 Cups Vegetable Broth
4 Cloves Garlic, Smashed
1 Cinnamon Stick
1 Bay Leaf
2 Teaspoons Lime Juice (optional)
Corn Tortilla Strips (optional for garnish)
Cilantro (garnish)
Sour Cream (garnish)

Step 1:  Heat the olive oil in a soup pot over medium heat.  Add the onions and a pinch of salt and saute until the onions are translucent.  Add the red bell pepper, jalapeno, minced garlic, oregano, cumin, cinnamon and 1/4 teaspoon of salt.  Saute for about a minute.  Add in 1/2 cup of the broth to deglaze the pot and cook until the liquid is reduced by half.

Step 2:  Add the remaining 7 and 1/2 cups of broth, black beans, smashed garlic, cinnamon stick and bay leaf.  Bring to a boil over high heat - then reduce to a simmer.  Partially cover and let simmer for 1 hour.

Step 3:  Using a slotted spoon, remove and discard the cinnamon stick and bay leaf.  

Step 4:  Remove half the black beans and set aside in a bowl.  

Step 5:  In batches if needed, puree the soup and beans the remained in the soup pot in a blender or food processor until smooth.  Return to the soup pot, add in the reserved beans and reheat if needed.  Taste and adjust seasoning - add additional salt if needed.  If desired, add lime juice.  

Step 5:  To serve, garnish with tortilla strips, cilantro and sour cream.

Friday, August 14, 2015

Unstuffed Tomatoes

Ahhhhhhhh . . .the dog days of summer.  Hot, humid days and the kids are almost ready to go back to school.  Scratch that (kids are almost ready to go back to school).  I am ready for the kids to go back to school ;)

In the meantime, why not feed them something easy and fresh while we enjoy these last few days of summer?  If you are like me, your tomatoes are going crazy!  I had planned on using some of my bumper crop of tomatoes to make 'stuffed tomatoes'.  However, I realized that my sweet, precious, -baby-boy-who-isn't-a-baby-but-really-a-little-and-mischevious-boy had decided to take a bite out of each tomato that I had picked and placed on the counter.  Yes.  I said each tomato.  Not one tomato.  Not two tomato.  But all 5 of them.  And as my memory flashed back, I can pinpoint the time of the crime . ..we were getting ready to leave the house and I had heard him say "mmmmmmmmmm...tomatoes yummy!" And then we were out the door.  

Anyhow, I decided to make the tomatoes regardless.    I had my heart set on them for dinner.  So, I took the recipe and made them 'unstuffed'.  I removed the 'bites' and used the remaining tomato parts.  What else was this mom supposed to do?  Any how, this recipe is not so much the visual show-stopper as when they are stuffed, but equally delicious.  


Unstuffed Tomatoes
Serves 2 as a Main Dish or 4 as a Side Dish

Ingredients:
3-4 Medium Sized Fresh Diced Tomatoes 
12 oz Mushrooms
2 TB Low-Sodium Soy Sauce 
3 TB Butter
2 Green Onions
1 Clove Garlic, Minced
1/4 Cup Grated Parmesan Cheese

Step 1:  Spray a 9x9 baking dish with nonstick spray.  Set aside.  Preheat oven to 425 degrees Fahrenheit.  While the oven is heating, wash the tomatoes.  Cut each tomato in half and remove the core, seeds and excess "slimy guts" part.  We really just want the firm flesh for this recipe.  Dice the firm flesh part of the tomato into medium sized pieces and place in the baking dish.

Step 2:  Finely chop the fresh mushrooms or pulse in a food processor.  Set aside.  Clean and prepare the green onions.  Thinly slice them.  Set aside.  Next, In a medium saute pan, melt the butter.  Add the mushrooms, green onions, soy sauce and garlic to the pan.  Saute over medium high heat until the butter and any liquid is absorbed and the mushroom mixture appears 'dry' and hot.

Step 3:  With a spoon, place "dollops" of the mushroom mixture on top of the tomatoes in the baking dish.  Sprinkle with Parmesan cheese.

Step 7:  Place baking dish into oven and bake for 15 minutes or so - until the Parmesan cheese browns.  Serve hot.


Friday, May 29, 2015

Roasted Beet and Green Apple Salad

My husband absolutely detests beets.  I can't even begin to describe how much he loathes them.  And I recently realized how much I actually miss and love, love, love beets.  Seriously, my parents grew them in the garden when I was a kid and I always looked forward to eating them.  My college roomie and I shared that love for beets . . . and her parents used to keep us in supply during the harvest months.  Then, I eventually married a man who hates beets.  How did that even happen?   And over time, I quit making them.  Dumb, right?  I didn't think much about it  . . until the other day when we were at a party and beets were being served.  And then I knew I had to make this salad as soon as possible.  I just couldn't wait.  My daughter and I will just need to eat the whole salad ourselves . . . oh darn!


Roasted Beet & Green Apple Salad
Serves 4-6
Ingredients:

3-4 Medium Sized Beets Roasted
1 Large Tart Green Apple
1 Tablespoon Red Wine Vinegar
3 Tablespoons Olive Oil
1 Teaspoon Thyme
1/2 Cup Toasted Walnuts
1/4 Cup Soft Cheese of Choice (goat cheese, whipped cream cheese, or Gorgonzola)

Step 1:  Once your roasted beets have cooled, peel and dice into bite sized pieces.  Add them to a large bowl.  Wash and core the apple.  Dice into similar sized pieces as the dice beet.  Add to the bowl.  Set aside.

Step 2:  In a small bowl, add the olive oil, red wine vinegar and thyme.  Mix together thoroughly with a fork.  Pour over the beets and apples.  Mix to combine.

Step 3:  To serve, dot the soft across the salad and sprinkle with walnuts.  

Refrigerate any leftovers.

Are you unsure about how to roast beets?  Click here to learn more.

Friday, May 15, 2015

BBQ Black Bean Quesadilla

Need a quick, easy and satisfying meal?  If you love bbq - you'll love these.  Soft, warm tortillas with a generous filling of gooey cheese, sweet and tangy bbq sauce, a little sharpness from red onion and all with the satisfaction of meatiness . . .without the meat.  Perfect for a quick meal for yourself . . or make a whole bunch and feed them to the family!  Please note, in the photo below - I used a whole wheat tortilla/low carb - the tortilla looks burnt because of it!  Use whatever kind of tortillas you enjoy.  


BBQ Black Bean Quesadilla
Serves 1

Ingredients:
1 TB BBQ Sauce
2 8-inch Tortillas
1/3 Cup Black Beans (from a can, rinsed)
1/4 Cup Cheese (cheddar, cojack, mexi-blend . . whatever you like!)
1-2 Tablespoons of Diced Red Onion
Non Stick Vegetable Oil Spray

Spray a large skillet with nonstick spray.  Preheat on stove-top over low heat.    Place 1 tortilla in the skillet.  Brush with the BBQ sauce.  Disburse the black beans on top of the black beans.  Sprinkle the beans with the cheese. Disburse the onion over the cheese.  Top with remaining tortilla.  Let cook over low for 3-5 minutes, or until bottom is browning.  Then, carefully flip the quesadilla over and cook another 3-5 minutes until that side is browned as well.  Transfer to a cutting board and slice it with a pizza cutter or sharp knife.  Serve hot.

Friday, March 20, 2015

Super Easy Coconut French Toast Bake

OMG.  
THAT is how good this french toast bake is.  
SERIOUSLY.  Hands down, this is the best french toast bake I have ever had.  Not.Even.Exaggerating.  It's made with King's Hawaiian rolls which offer a little sweetness to the french toast, without making it too sugary.  As well, it doesn't taste like coconut, even though it uses coconut milk as a main ingredient.  Once baked, you can top it with almost any fresh fruit.  We have served it with bananas - which is divine.  I've also eaten it  topped with strawberries (as pictured) - equally divine.  Just go with whatever you like!
Easy peasy - this would be a great Easter brunch addition.
Please Note:  this recipe can also be found here.
And some mad props to my hubby who not only found the recipe, but made it too!


Super Easy Coconut French Toast Bake
Ingredients:

1 package KING'S HAWAIIAN Original Hawaiian Sweet Dinner Rolls
1 Can Regular Coconut Milk
1 Cup Milk
7 Eggs
2 Teaspoons Vanilla

Optional Extras for Topping:
Turbinado Sugar
Sliced Bananas
Sliced Strawberries
Flaked Coconut
Maple Syrup or Coconut Syrup


Step 1
1.Preheat the oven to 350 degrees. Tear the bread into bite-sized pieces. Arrange evenly in a greased 9x13 baking dish.

Step 2
2.Whisk the coconut milk, milk, eggs, and vanilla in a large bowl. Pour the milk mixture over the bread, covering all pieces. Bake for 40-45 minutes, keeping an eye on the top and covering with foil if it starts to burn. When finished, the french toast bake will be puffy and firm (shouldn't jiggle when you shake it back and forth).

Step 3
3.Optional: After everything is fully baked, top with turbinado sugar and banana slices and return to the oven uncovered for a few minutes until golden brown. Remove and let stand for 15 minutes. Top with strawberry slices for a big color pop!

Friday, October 10, 2014

Spanish Rice

Here is my favorite recipe for Spanish Rice.  Once you make this, you will never go back to buying the canned or boxed version.  Trust me, this is easy and delicious!  Added bonus:  this freezes great!  Cook up a double batch and freeze half . . .then thaw out at a later date.  Totally worth it.  Ole!


Spanish Rice
Serves 4-6

1 Tablespoon Butter
1/2 Cup Chopped Onion
1/8 Cup Chopped Green Pepper
14 oz Can Diced Tomatoes
3/4 Cup Water
1/2 Cup Uncooked Minute Rice
1/4 Cup Chili Sauce
1/2 Teaspoon Salt
1/4 Teaspoon Celery Salt
1/2 Teaspoon Brown Sugar
1/4 Teaspoon Worcestershire Sauce
1/2 Teaspoon Paprika
1/4 Cup Shredded Cheddar Cheese

In a large saucepan, add the butter and saute the onion and green pepper until fragrant and translucent (do not let it get brown).  Stir in the remaining ingredients except for the cheese.  Simmer on low and uncovered until thick - about 35 minutes.  Check frequently and stir occasionally to make sure it isn't sticking to the pan.  To serve, sprinkle with cheddar cheese.


Friday, August 22, 2014

Weeknight Tostadas

Every Sunday morning routine seems to reign.  Retrieve paper from the neighbor's driveway, separate the sections, look at the advertisement circulars, complain that nothing good is on sale, and then ask hubby what he wants for dinner this week.  He almost inevitably responds, "Tacos".  Or maybe, just maybe - he'll say "something Mexican".  If you are like me and get tired of the same-old, same-old tacos . . .try this out.  They are fabulous.  These can also be made without meat for a yummy meatless meal.


Weeknight Tostadas
Ingredients:

1/2 Can Red Enchilada Sauce (10 oz can - save or freeze the rest)
1 Can Refried Beans (same size can as above, but use the whole thing, please note the weight will be different)
1 - 2 lbs Taco Meat Prepared (I used ground beef)
Shredded Cheese of Choice (I used taco blend)
Taco Fixin's of Choice (lettuce, guacamole, etc)

Step 1:  Open up the refried beans and place in skillet.  Slowly mix in the enchilada sauce. Heat over medium high heat, stirring occasionally until heated through.
Step 2:  Heat up your taco meat if it's not already heated.
Step 3:  Assemble.  Place a tostada on a plate, spread with the bean/sauce mixture and sprinkle with cheese.  Garnish with all your favorite taco fixin's!


Friday, July 25, 2014

Eggplant Parmesan

Eggplant:  do you love it as much as I do?  Or, are you a little skeptical?  Well, this recipe is a sure winner for you skeptics out there.  You slice up the eggplant, bread it and then bake it.  From there, you can serve as is or you can layer it with some red sauce and mozzarella (much like Eggplant Parmesan).  Give it a try . . .tender eggplant, crispy coating . . .mmmmmm.  This recipe is my take on Eggplant Parmesan . . .which is a little different than the traditional version.  I like my eggplant to have a crispy coating; so I assemble the eggplant and bake it first and then top with creamy mozzarella and marinara sauce.


Eggplant Parmesan
Serves 3-4 as a Side Dish or
2 as a Main Dish

Ingredients:
1 Large Purple Eggplant
1 Cup Breadcrumbs
1/4 Cup Parmesan Cheese
1 TB Italian Seasoning
2 Eggs
1 Cup Flour
2 TB Corn Starch
1 Cup Shredded Mozzarella or Sliced Mozzarella
1 Cup Marinara Sauce
Olive Oil

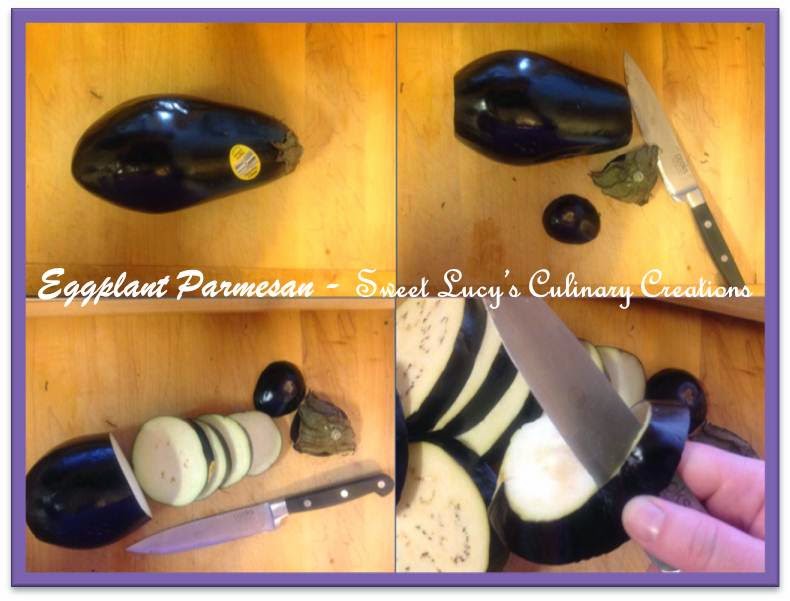
Step 1:  Slice off the ends of the eggplant and then slice into 1/2 inch - 3/4 inch pieces.  Peel and place in colander.


Step 2:  Sprinkle the eggplant with salt and place the colander in the sink or into a bowl.  The salt will help release the excess moisture.  Let stand for a minimum of 30 minutes.

Step 3:  Rinse the eggplant and pat dry.  Set aside.


Step 4:  Preheat the oven to 350 degrees Fahrenheit and prepare a large baking by spraying it with nonstick spray.

Step 5:  Gather three shallow dishes.  In the first dish, add the flour and cornstarch.  Blend well with a fork.  In the second dish, place your eggs slightly beat.  In the third dish, place the breadcrumbs, Parmesan cheese and Italian seasoning;  mix together.


Step 6:  Dip an eggplant slice first into flour mix, then the egg and then dredge it in the breadcrumb mixture.  Place on the baking sheet.  Repeat this until all eggplant slices are coated.


Step 7:  Drizzle the coated eggplant slices with olive oil.


Step 8:  Bake in oven for 15 minutes.  Remove from oven, flip all slices and return the pan to the oven and bake for an additional 15-20 minutes or until golden brown on the outside and soft on the inside.


To Serve:  Top each eggplant piece with mozzarella and marinara sauce.  Basil and parsley garnishes are optional.


Friday, April 11, 2014

BBQ Black Beans

Versatile = Black Beans.  Gotta love them. Firm, mild flavor, nicely sized.  Delish.  I like to buy the canned variety, specifically Wild Harvest brand.  They come out of the can not-too-sludgy and are still whole and have a very nice creamy texture when you eat them.  Not all brands tend to be that way.   

This recipe is one of my favorite ways to eat them.  It can be eaten as a meal, a side dish, or an appetizer.  Meal - serve along with some fruit (this is what I'm having for lunch today) or wrap it up in a flour tortilla for a bbq bean burrito.  Side Dish - would be yummy with a thick slab of meat on the side.  Appetizer?  Serve along with your favorite corn chips for dipping.  It's a little sweet - but the green onion helps to offset it.  As well, the sweetness is very dependent on the BBQ sauce that you use.


BBQ Black Beans
Serves 4 as a Side Dish
Ingredients:

1 (15-oz) Can Black Beans, drained and rinsed
1/2 Cup BBQ Sauce
1/2 Cup Cheddar or CoJack Cheese
3 or 4 Green Onions, cleaned and sliced

Step 1:  Place the black beans in a microwave-safe bowl and mix in the BBQ sauce.  Place the bowl in the microwave, covered with a paper-towel, and cook on high for 2 minutes.

Step 2:  Carefully remove the bowl from the microwave and stir the beans.  Sprinkle the cheese on top of the BBQ beans.  Return the bowl to the microwave, place paper-towel on top again.  Heat on high for 1 minute.

Step 3:  Remove the bowl from the microwave, sprinkle the beans with the sliced green onions and serve.

Friday, May 31, 2013

Caprese Salad with Balsamic Glaze

Now that (I think) summer has finally arrived, I thought I'd share one of my favorite recipes:  Caprese Salad with Balsamic Glaze.  Just thinking about it makes my mouth water.  

It's a great summer salad:  cherry or grape tomatoes, fresh basil, fresh mozzarella and a sweet/tart balsamic glaze.  Very simple, very elegant and always delicious.  It makes a great side salad or a meatless meal.

Enjoy!


Caprese Salad

1 pint Cherry Tomatoes
1 fresh ball Mozzarella
5 large Basil leaves
3/4 Cup Brown Sugar
1/4 Cup Balsamic Vinegar
1/4 Cup Water

In a small saucepan, combine the brown sugar, water, and balsamic vinegar.  Stir together and heat over low until in comes to a boil.  Let boil for 30 seconds and remove from heat.  Let cool.  This will make enough glaze for 3 or 4 salads.

Wash and  prep the tomatoes by cutting each cherry tomato in half.  Place in a medium-sized bowl.  Next, prep your mozzarella by cutting the ball into small bite-size pieces.  Add to the bowl with the tomatoes.  Now, shred the basil and add to the tomatoes and mozzarella.  Use your discretion on the basil - you can always add more if you like.

Once balsamic glaze is cool to touch, drizzle over the salad and toss to combine.  A little of the glaze goes a long way.  Sprinkle with black cracked pepper before serving.  Delicious!

To save the extra glaze - place in sealed container (like an old small jar) and it should keep for 3-4 weeks on the shelf.

Friday, February 22, 2013

Three Cheese Manicotti

It's Friday.  It's the second Friday in Lent.  What's for dinner?  Good question.  It's 4pm here and this is what I am craving:  Three Cheese Manicotti.

Of course, I have none of the ingredients on hand, it's snowing (hasn't stopped all day) and I really don't feel like going to the grocery store.

However, I am going to blog about it :)  It's a pretty killer manicotti recipe   It's one of those recipes you file under "fancy".  Even if it really isn't fancy, it was definitely fancy when I first learned how to make it over 15 years ago.  It was the first from-scratch recipe that I really mastered.  It was always the recipe that you made when you wanted to impress someone.  As well, you can assemble it a day ahead of time - which is especially nice if you are short on time or plan to serve this to guests.  Just put it in the fridge and then bake the next day.  Serve this with a green salad and a nice red wine and voila!  Dinner.  Or, if you have hearty carnivores in your household - use the manicotti as an accompaniment to a good steak (that's how I prefer it).  Or, if you enjoy a meatless meal - have at it!  Enjoy.


Three Cheese Manicotti
3/4 Cup Chopped Onion
1 Clove Garlic, Minced
1 Tablespoon Olive Oil
1-16oz Can Diced Tomatoes
1-8oz Can Tomato Sauce
1 Teaspoon Sugar
1 Teaspoon Oregano
1/4 Teaspoon Thyme
1 Small Bay Leaf
8 Manicotti Shells
2 Eggs, Beaten
2 Cups Shredded Mozzarella Cheese
1 and 1/2 Cups Ricotta Cheese
1/2 Cup Grated Parmesan Cheese
2 Tablespoons Parsley
1/2 Teaspoon Oregano

For the sauce, in a medium saucepan, cook the onion and garlic in hot oil until tender but not brown.  Add the undrained tomatoes, tomato sauce, sugar, 1 teaspoon oregano, thyme and the bay leaf.  Bring to a boil; reduce heat and simmer uncovered for 20-25 minutes until thickened.  Remove from heat and discard the bay leaf.

Meanwhile, cook the manicotti shells according to package directions;  drain.  Rinse the shells in cold water.

For the filling, in a mixing bowl, stir together the beaten eggs, the ricotta cheese, the Parmesan cheese, parsley, a 1/2 teaspoon of oregano, a dash of pepper and 1 cup of the mozzarella cheese.  Spoon the filling into the manicotti shells.

Pour half of the tomato mixture into a 2 quart rectangular baking dish.  Arrange stuffed manicotti in the baking dish.  Pour remaining sauce over the shells.  Sprinkle the remaining mozzarella over the top of the sauce.  If desired, cover and chill the manicotti for up to 1 day.

To serve, bake the stuffed manicotti covered in a 250 degree Fahrenheit oven for 35-45 minutes or until heated through.

Friday, January 4, 2013

Black Bean Burritos

I am a firm believer that some of the best meals are forced through creativity with what's remaining in the fridge and cupboards.  AKA . . .I need to go grocery shopping.  Upon perusing the pantry, I realized I had two cans of black beans.  No brainer here - that told me I had to use one of those cans today.  But how was I going to use it?  Typically, we keep black beans around for my jambalaya or stuffed peppers . . but neither of those were going to happen today.  I really didn't want to go to the store either, so whatever I made was restricted to my barren back stock of goods.  And I can't complain, I came up with some pretty delicious black bean burritos!  Please note, I like things spicy.  So, if you think ketchup is spicy - you want to cut back on the seasoning in this recipe.

015

Black Bean Burritos

1 Can Black Beans, drained and rinsed (I prefer Wild Harvest brand black beans)
1.5 Cups frozen Bell Pepper Pieces with Onion (Bird's Eye makes a pepper/onion blend)
1 TB Olive Oil
1/4 Cup Salsa (I use Essential Everyday Medium Salsa)
1/4 tsp Cayenne Pepper
1/2 tsp Cumin
1/2 tsp Coriander
1/2 tsp Chile Powder
1 tsp Chopped Garlic
4 TB Sour Cream
4 Flour Tortillas (medium sized)

In a medium saucepan over medium heat, add the olive oil and the pepper/onion blend.  Saute until thawed.  Add the remaining ingredients and stir until well combined.  Continue to cook until the liquid is evaporated and everything is hot.

To serve, spread each tortilla with 1 TB of sour cream.  Next, divide the bean mixture evenly amongst the tortillas.  Fold and roll each tortilla into burrito form and enjoy!

This recipe makes 4 burritos.