Thursday, January 9, 2014

Chili

One of the most amazing things about having a farmer in your family - is reaping the benefits :)  At Christmas time we were given a freezer-full of pork.  So, what to do with all of it?  How about a hearty chili to warm you up during this freeze-a-thon we call winter?  This recipe is slightly adapted from Fine Cooking (Feb/March 2014 issue).  They did a featured article on a 'build your own chili'.  I have to say, this turned out super yummy.  Serves 6.


Chili 
Ingredients:
1.5 lbs of Ground Pork
2 Cups Onion, chopped
1 Tablespoon Chopped Garlic
2 Tablespoons Chili Powder
1 Tablespoon Ground Cumin
1 Tablespoon Tomato Paste
1 Teaspoon Ground Coriander
2 Teaspoon Oregano
1 (4 oz) Can of Green Chiles
3/4 Cup Water
1 (14 oz) Can of Dice Tomatoes
2 and 1/2 Cups Chicken Stock
2 (14 oz) Cans of Pinto Beans (drained)
1 Tablespoon Vinegar
1 Tablespoon oil

Step 1:  In a large pan, brown your meat.  Remove from pan and add to a crock-pot.

Step 2:  In that same pan, add 1 tablespoon of oil and heat.  Add in the chopped onion and garlic.  Cook until the onions are soft and translucent, just beginning to brown.  Then, add in the chili powder, cumin, tomato paste, coriander, oregano and green chiles.  Stir together and cook about 1-2 minutes.  Do not skip this step - letting the spices cook together and heat up really starts to realease their flavors!

Step 3:  Add the 3/4 cup of water and bring to boil.  This will loosen the stuff that may be stuck on the bottom of the pan (which contains a ton of flavor!!).  Stir and scrape up anything stuck to bottom.

Step 4:  Add the tomatoes and chicken stock.  Stir.  Bring to a boil and let simmer for 5 minutes.

Step 5:  While your stock is simmering, drain your pinto beans and add them to the crock-pot.

Step 6:  Remove the pan from the heat and add the stock/onion/tomato/seasonings concoction into your crock-pot.  BE CAREFUL - it will be hot.  Is your pan too full?  Then just transfer it scoop by scoop with a measuring cup or large spoon.  Better to be safe than sorry.

Step 7:  Let it simmer in the crock-pot on low for 4-6 hours.

Step 8:  Just before serving, stir in 1 Tablespoon of Cider Vinegar.  This will add a ton of 'bright' flavor.

To Serve:  Fill a soup bowl and garnish at own will :)  My hubby is all about sour cream and cheese.  I prefer mine plain, but I like to eat it with buttered crackers.  To each their own!

Thursday, December 26, 2013

Banana Bars with Cream Cheese Frosting


So, life's been a little busy lately.  And by busy . . .I mean that I am ready to pull my hair out.  Which reminds me, I think I have an upcoming hair appointment that I should reschedule.  And ewwwwwwwwwwwwww ...... let's hope that you don't get any hairs in these awesome Banana Bars with Cream Cheese Frosting!  Because these are crazy good . . .it's hard to eat just one :)

Banana Bars
Ingredients

1-1/2 Cups Sugar
1 Cup Sour Cream
1/2 c. Butter or Margarine, Softened
2 Eggs
3 or 4 Ripe Bananas, Mashed
2 Teaspoons Vanilla
2 Cups Flour
1 Teaspoon Baking Soda
3/4 Teaspoon Salt

Step 1:  Preheat the oven to 375 degrees Fahrenheit and grease a 15×10-inch jelly roll pan.  Set aside.
Step 2:  In a large mixing bowl, cream (beat) the eggs, sugar and sour cream until well combined.  Step 3:  Add in the bananas, vanilla, baking soda and salt.  Mix until well combined.
Step 4:  Add in the flour, and mix just until combined.
Step 5:  Spread the batter into the jelly roll pan and bake for 20-25 minutes.  Insert a toothpick to test for doneness.  Cool.

Cream Cheese Frosting
Ingredients

8-ounces of Cream Cheese, Softened
1 Teaspoon Vanilla
1 Stick of Butter (or a 1/2 Cup), Softened
2 and 1/3 Cup Powdered Sugar

Step 1:  In a large mixing bowl, beat the cream cheese, butter and vanilla until smooth.  
Step 2:  Slowly add in the powdered sugar one cup at a time into the mixer and combining until smooth.  Then repeat with the remaining cup of powdered sugar and the last 1/3 cup.  Beat until very smooth.
Step 3:  Frost the Banana Bars

Tips:
1.  You can change up the frosting easily by using different extracts.  I love to use maple.  It's divine.
2.  After the bars are cooled and frosted, you may want to cut them all and then place into a covered container.  I usually place them in a cake pan and stack them with wax paper in between.  It's easier than storing a jelly roll pan with plastic wrap or tinfoil covering it!  Of course, that is assuming your family doesn't devour them instantly.


Friday, October 11, 2013

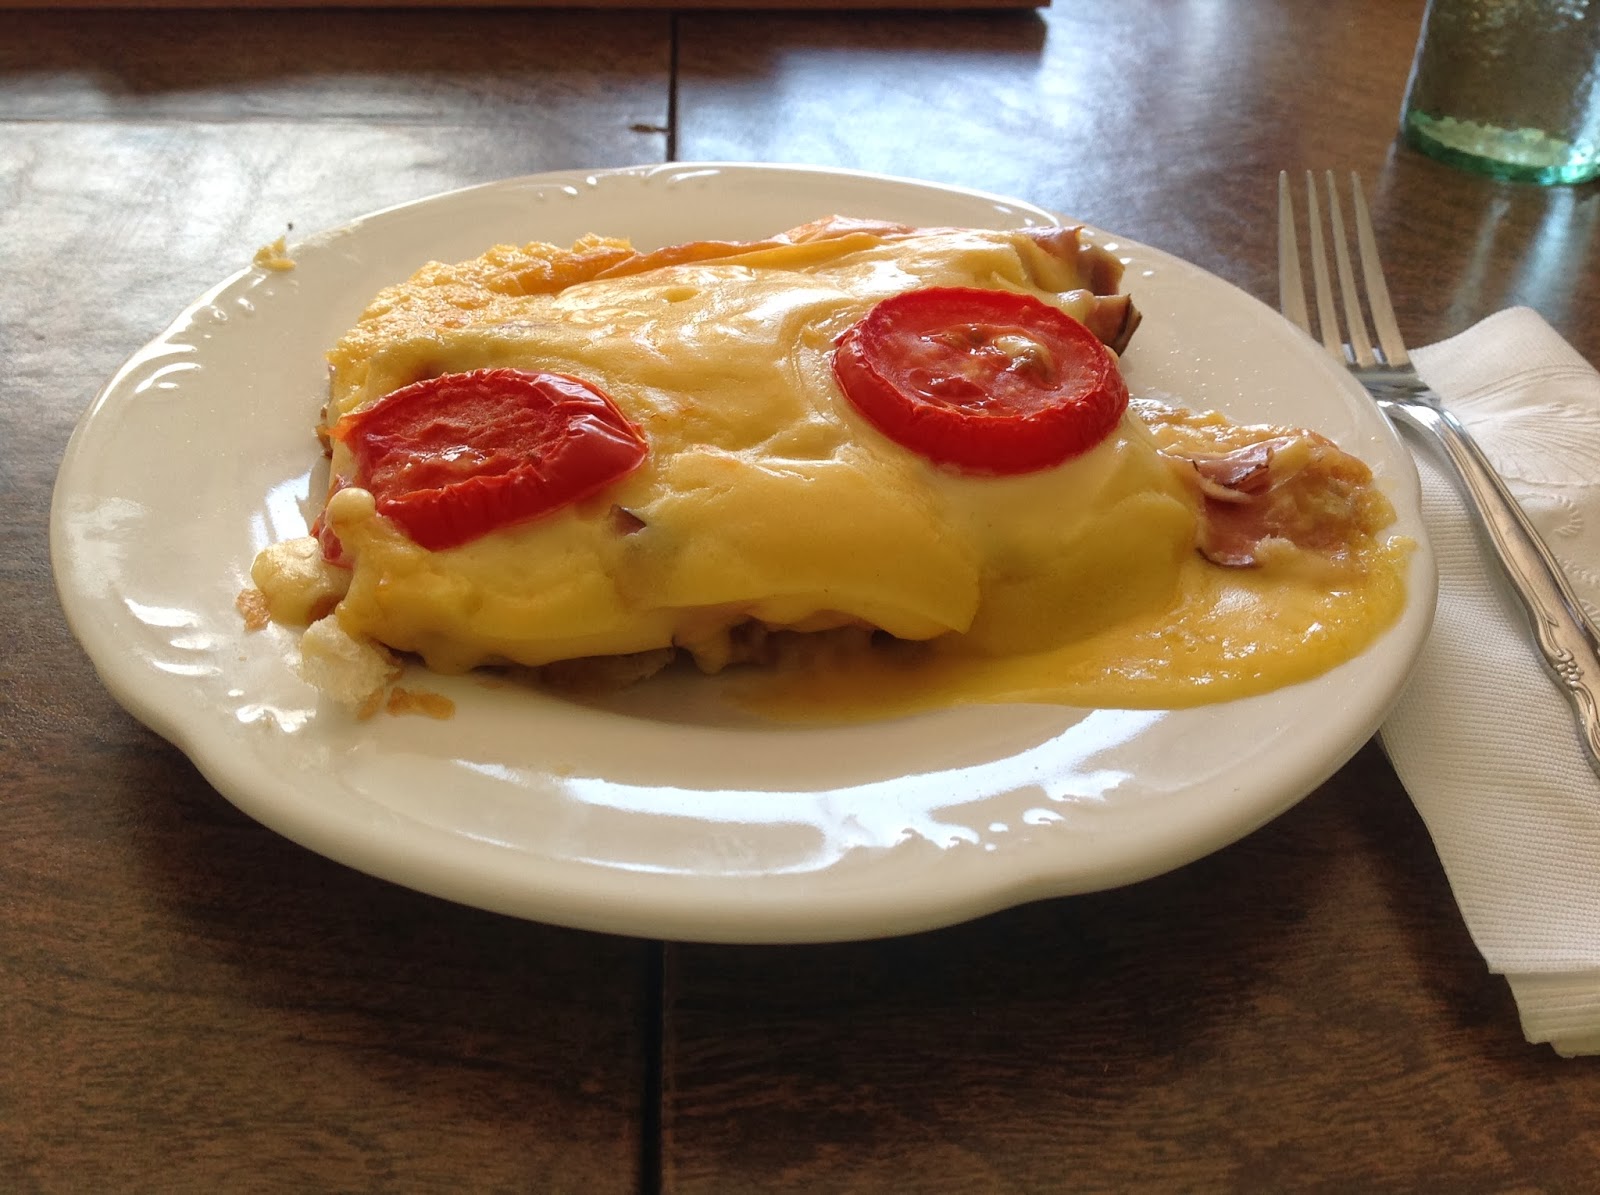
Sandwich Hot Dish - Ham and Turkey

I'm without a stove top right now and I'm not even sure when we're gonna fix it.  It's been one of those months . . .with a lot of unexpected expenses.  And then my glass-top stove top cracked and that is now the the icing on the cake.  Or the cheese sauce on the sandwich.  Which ever way you want to look at it.

And now I'm reduced to relying on the oven (which still works) and the microwave . . and let's not forget about all those electronic appliances that have accumulated over the years (that I tend to complain about all the time).   You know the ones . . .the sandwich maker, the Foreman grill, etc etc.  All of them great if you are only feeding yourself and not your family.

This hot dish though - this, this is a different story.  Ooey gooey cheesy.  Yummmmmmmmmm!


Sandwich Hot Dish - Ham and Turkey

Ingredients:
10 Slices of Bread, torn in pieces
1 lb Ham Lunch Meat
1 lb Turkey Lunch Meat
10 Tablespoons of Butter
3/4 Cup Flour
3 and 1/2 Cups Milk
16 oz of Processed Cheese, Cubed (such as Velveeta)
1/2 Cup Parmesan Cheese
2 Tomatoes, Sliced

Step 1:  Preheat oven to 350 degrees Fahreneheit.  Lightly grease a 9 x 13 baking pan.

Step 2:  Place bread in the bottom of the pan, layering if needed.

Step 3.  Lay the ham lunch meat on top of the bread, distributing evenly.  Do the same with the turkey lunch meat.

Step 4:  In a pot, melt the butter over medium heat.  Whisk in the flour until smooth and cook for 2 minutes, whisking constantly.  Gradually whisk in the milk and cook for 3-4 minutes, whisking constantly until thickened.  Add both cheeses and stir until melted and smooth.

Step 5:  Pour the cheese mixture over the turkey layer.  Place tomato slices on top.

Step 6:  Bake for 20 - 25 minutes or until hot and bubbly.  

Friday, October 4, 2013

Balsamic Steak with Garlic Zucchini

This recipe is originally from Everyday Food.  As with most recipes, I customized it to my families tastes:  I added onion to the zucchini and used a different cut of steak (I subbed top round instead of using skirt steak).  I also used low-sodium Montreal Steak Seasoning in addition to the salt and pepper.  All this turned out absolutely wonderful.  The only thing I would do next time - is add sliced mushrooms to the zucchini in addition to the onion and garlic.  


Balsamic Steak with Garlic Zucchini 
(my version)

Ingredients:

2 TB Olive Oil
5 Cloves Garlic, minced
3 Medium Zucchini, sliced thin
1 Medium Yellow Onion, sliced
1.5 pounds Steak, sliced thin
3/4 Cup Balsamic Vinegar
1 Teaspoon Low-Sodium Montreal Steak Seasoning
Salt & Pepper

Directions:  In a large skillet, heat 1 TB of olive oil over medium-high.  Add the onion, garlic and zucchini.  Sprinkle with the steak seasoning.  Saute until the zucchini is starting brown.  Transfer to dish.
Add remaining TB of olive oil to the skillet.  Season the steak with the steak seasoning.  Add to the skillet, arranging so that each piece lays flat on the bottom of the pan.  If all the slices don't fit, you can cook the steak in batches.  Sear the steak on both sides and then transfer to a plate.  Repeat this step until all the steak is cooked.  
Once the steak is all cooked and removed from the pan, add the balsamic vinegar and a little salt and pepper.  Cook, stirring, until reduced by half.  Be sure to scrape up any tasty bits of steak etc from the pan.  As well, add any accumulated juices from the steak on the plate to the pan.   
To serve, drizzle the balsamic glaze over the steak and serve the veggies on the side.

Monday, September 30, 2013

Foodie Penpal Reveal Day #3

Happy Foodie Penpal Day!

Do you know what I love more than chocolate and coffee??  A FOODIE PENPAL WHO SENDS ME CHOCOLATE AND COFFEE!

This month my Foodie Penpal Package arrived from Texas. 


As you can see - there is some yummy stuff in there:

1.  Spinach & Kale Chips - This was a new experience for me . ..and I really liked them!  Excellent flavor and super crunchy.

2.  Kashi Bars - It's been a while since I had Kashi bars, so I hadn't had this flavor.  Very yum.  Not too sweet and nice kick of salt in them.

3.  Roasted Seaweed Snacks (Honey Mustard flavor) - Haven't tried these yet.  They definitely sound interesting.

4.  Peet's Coffee - good timing on this one!  We were nearly out of coffee and this was opened and brewed soon after receiving :)  I haven't seen this brand at the grocery store - but it is delicious.

5.  Barney Butter - Almond butter, what's not to love?

6.  Mexican Chocolate - I am very excited about this one.   Many, many moons ago I went on a high school trip (including a family stay) to Mexico.  They really do have the best hot chocolate.  Hoping to use this to create a fabulous mug of said liquid.

7.  Lindt Chocolate Bars - really?  Do I need to say anything else!  *I <3 Chocolate*

8.  Pink Onion Salt - not sure how I'll use this yet, but it will happen soon . . I'm sure of it.

9.  Berry Fruit Strips - Very yummy.  Not too sweet and too chewy.  Excellent.

Curious about the Foodie Penpal Program? Head over to The Lean Green Bean for more details!

Friday, September 27, 2013

Peanut-Nut Toffee Bars

These tasty treats are a family favorite.  And by family favorite, I mean that when ever my dads family would have a get-together, it was my mom's duty to bring the Peanut-Nut Toffee Bars.  What makes these so special?  Well, they are a little bit like a home made granola bar . . .but a thousand times better.  They are sweet, chewy and a little nutty and they have a wonderful toffee flavor, not a sugary-flavor like granola bars.  And they were everybody's favorite and I am not joking about this.  She knew they were everyone's favorite too and when she baked them - she even had a little smile and twinkle in the eye.   After Mom passed on, the family thought that I could automatically take over the recipe.  Or so they assumed.  Of course, I couldn't find it anywhere.  I searched for years.  Seriously:  years.  And then one day, while flipping through a cookbook I had looked through a million times before . . .two pages were stuck together.  And there was the recipe.  Not that I've brought it to any family function, but at least know where it is.  And now, without much further ado . . . 

Peanut-Nut Toffee Bars
4 Cups Oatmeal
1/4 Cup Melted Butter
1/4 Cup Melted Shortening
1/2 Cup Light Corn Syrup
1 Cup Brown Sugar
3 Teaspoons Vanilla
2/3 Cup Peanut Butter
2 Cups Chocolate Chips
2/3 Cup Chopped Walnuts (optional)

Step 1:  Preaheat oven to 350 degrees F.  Prepare large cookie sheet by lining with parchment paper (I highly recommend doing this - it is very important.  The bars will likely stick otherwise).

Step 2:  Combine oatmeal, butter, shortening, syrup, brown sugar and vanilla as if for pie crust.  Pat onto cookie sheet;  bake for 10 minutes.  

Step 3:  Melt peanut butter and chocolate chips in double boiler;  add nuts.  Spread onto bars;  cut while warm.


Friday, September 20, 2013

Malt Chocolate Cake

I love to bake.  It's no secret.  And a while back my mother-in-law gave me an old calendar that had some recipes in it from the local creamery.  First it sat on the counter.  Then it made it's way to the cupboard . . .and there it sat for about a year and a half.  Until the other day that is.  I was in the cupboard to grab something and shebam, it fell out of the cupboard.  And seeing as I was in one of those cleaning moods . . .it was time to go through it and file it away appropriately.  

And this cake, OMG, it is da bomb!  Evilly delicious. And super simps.  


Malt Chocolate Cake 
(Hastings Creamery Calendar)

Ingredients:

For the Cake:
2 Cups Flour
1 and 1/2 Cups Sugar
1/4 Cup Malt Powder
6 Tablespoons Unsweetened Cocoa
1 Teaspoon Salt
1 Tablespoon Baking Soda
1 Egg, Beaten
2/3 Cup Oil
1 Cup Buttermilk
1 Cup Hot Coffee

For the Frosting:
14 Tablespoons Butter, softened
3 Cups Powdered Sugar
2 Teaspoons Unsweetened Cocoa
1/2 Cup Malt Powder
4 Teaspoons Milk

For the Cake . . . .
Step 1:  Preheat oven to 350 degrees Fahrenheit.  Grease and flour a 9x13 cake pan.  Set aside.

Step 2:  Combine the flour, sugar, malt, salt, baking soda and cocoa in a large bowl.

Step 3:  Stir in the beaten egg, oils and buttermilk and mix until combined.

Step 4:  Slowly stir in the hot coffee.  Mix until the ingredients are well combined, scraping the sides and bottom of the bowl as necessary.  This will be a very thin batter.

Step 5:  Pour the batter into the cake pan.  Bake the cake for 30-35 minutes, until the top springs back when touched and a cake tester comes out clean.  Cool completely before frosting it.

For the Frosting. . . .
Step 1:  Beat the softened butter in a medium bowl.  Gradually add in the powdered sugar, cocoa, malt powder and milk.  Mix until well combined.